

Flutter勉強中です!
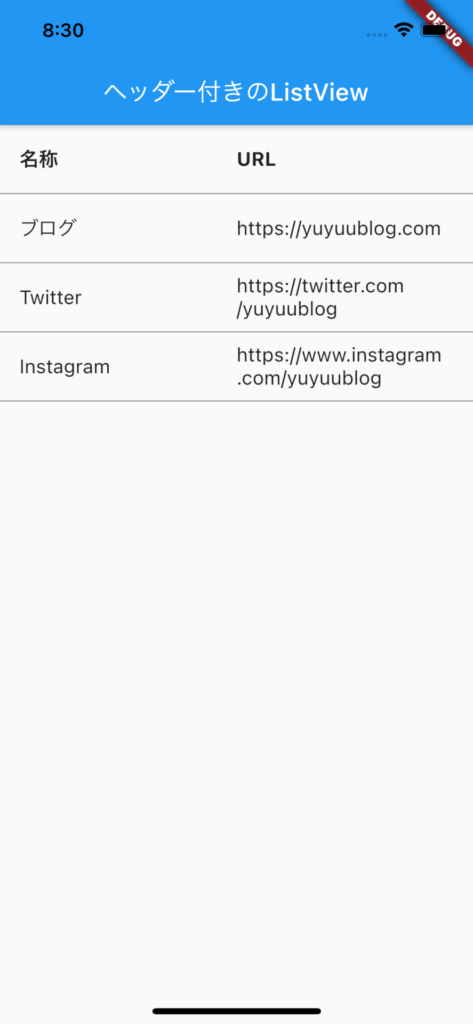
画面イメージ
リストにヘッダーをつけたListViewを作成します。
今回は「名称」、「URL」というヘッダーたリストです。
実装コード
import 'package:flutter/material.dart';

void main() {
  runApp(MyApp());
}

class MyApp extends StatelessWidget {
  // This widget is the root of your application.
  @override
  Widget build(BuildContext context) {
    return MaterialApp(
      title: 'Flutter Demo',
      theme: ThemeData(
        primarySwatch: Colors.blue,
      ),
      home: MyHomePage(),
    );
  }
}

class MyHomePage extends StatelessWidget {
  @override
  Widget build(BuildContext context) {
    final items = [
      {
        "name": "ブログ",
        "url": "https://yuyuublog.com",
      },
      {
        "name": "Twitter",
        "url": "https://twitter.com/yuyuublog",
      },
      {
        "name": "Instagram",
        "url": "https://www.instagram.com/yuyuublog",
      },
    ];

    return MaterialApp(
      home: Scaffold(
        appBar: AppBar(
          title: Text('ヘッダー付きのListView'),
        ),
        body: new Column(children: <Widget>[
          _listHeader(),
          ListView.builder(
            shrinkWrap: true,
            physics: NeverScrollableScrollPhysics(),
            itemCount: items == null ? 0 : items.length,
            itemBuilder: (context, index) {
              return _listTile(items[index]);
            },
          ),
        ]),
      ),
    );
  }

  Widget _listHeader() {
    return Container(
        decoration: new BoxDecoration(
            border: new Border(bottom: BorderSide(width: 1.0, color: Colors.grey))
        ),
        child: ListTile(
            title: new Row(
                children: <Widget>[
                  new Expanded(child: new Text("名称", style: new TextStyle(fontWeight:FontWeight.bold))),
                  new Expanded(child: new Text("URL", style: new TextStyle(fontWeight:FontWeight.bold))),
                ]
            )
        )
    );
  }

  Widget _listTile(items) {
    return Container(
        decoration: new BoxDecoration(
            border: new Border(bottom: BorderSide(width: 1.0, color: Colors.grey))
        ),
        child: ListTile(
            title: new Row(children: <Widget>[
              new Expanded(child: Text("${items["name"]}")),
              new Expanded(child: Text("${items["url"]}")),
            ]
            )
        )
    );
  }
}
ソースはGitHubからも取得できます。
https://github.com/yuyuu-dev/example_header_listview
ソースコード説明
表示するデータです。
final items = [
  {
    "name": "ブログ",
    "url": "https://yuyuublog.com",
  },
  {
    "name": "Twitter",
    "url": "https://twitter.com/yuyuublog",
  },
  {
    "name": "Instagram",
    "url": "https://www.instagram.com/yuyuublog",
  },
];
Columnに_listHeader()でヘッダー部を作成し、その下にListView.builderでリストのデータ部を作成しています。
        body: new Column(children: <Widget>[
          _listHeader(),
          ListView.builder(
            shrinkWrap: true,
            physics: NeverScrollableScrollPhysics(),
            itemCount: items == null ? 0 : items.length,
            itemBuilder: (context, index) {
              return _listTile(items[index]);
            },
          ),
        ]),
リストのヘッダー部分を作成するメソッドです。
ListTileの中にRowを作成し、Expandedにテキストを表示することで自動でいい感じの幅調整をおこないます。
  Widget _listHeader() {
    return Container(
        decoration: new BoxDecoration(
            border: new Border(bottom: BorderSide(width: 1.0, color: Colors.grey))
        ),
        child: ListTile(
            title: new Row(
                children: <Widget>[
                  new Expanded(child: new Text("名称", style: new TextStyle(fontWeight:FontWeight.bold))),
                  new Expanded(child: new Text("URL", style: new TextStyle(fontWeight:FontWeight.bold))),
                ]
            )
        )
    );
  }
リストのデータ部分を作成するメソッドです。
引数に受け取ったデータをヘッダー部分と同じようにExpandedにテキストとして表示することでいい感じの幅調整をおこなっています。
  Widget _listTile(items) {
    return Container(
        decoration: new BoxDecoration(
            border: new Border(bottom: BorderSide(width: 1.0, color: Colors.grey))
        ),
        child: ListTile(
            title: new Row(children: <Widget>[
              new Expanded(child: Text("${items["name"]}")),
              new Expanded(child: Text("${items["url"]}")),
            ]
            )
        )
    );
  }
まとめ
以上でListViewを使ったヘッダー付きのリスト表示が可能になりました。
ありがとうございました!